Gateway负载均衡及集群搭建
注:本文写的是Gateway的负载均衡及集群的搭建,Gateway的使用不在本文中介绍。
Gateway-负载均衡
负载均衡,英文名称为Load Balance,其含义就是指将负载(工作任务)进行平衡、分摊到多个操作单元上进行运行,例如FTP服务器、Web服务器、企业核心应用服务器和其它主要任务服务器等,从而协同完成工作任务。
准备
- Nacos:1.3.1
- JDK版本:1.8
- 系统:Win10
一、创建Gateway项目
这里不在详细说明Gateway的创建。最简单的方式就是使用IDEA的Spring Initializr创建,只需勾选几下就可以了。
1
2
3
4
5
6
7
8
9
10
11
12
13
14
15
16
17
18
19
20
21
22
23
24
25
26
27
28
29
30
31
32
33
34
35
36
37
38
39
40
41
42
43
44
45
46
47
48
49
50
51
52
53
54
55
56
57
58
59
60
61
62
63
64
65
66
67
68
69
70
71
72
73
74
| <?xml version="1.0" encoding="UTF-8"?>
<project xmlns="http://maven.apache.org/POM/4.0.0" xmlns:xsi="http://www.w3.org/2001/XMLSchema-instance"
xsi:schemaLocation="http://maven.apache.org/POM/4.0.0 https://maven.apache.org/xsd/maven-4.0.0.xsd">
<modelVersion>4.0.0</modelVersion>
<parent>
<groupId>org.springframework.boot</groupId>
<artifactId>spring-boot-starter-parent</artifactId>
<version>2.2.11.RELEASE</version>
<relativePath/>
</parent>
<groupId>cn.yanghuisen</groupId>
<artifactId>gateway-1</artifactId>
<version>0.0.1-SNAPSHOT</version>
<name>gateway-1</name>
<description>Demo project for Spring Boot</description>
<properties>
<java.version>1.8</java.version>
<spring-cloud-alibaba.version>2.2.1.RELEASE</spring-cloud-alibaba.version>
<spring-cloud.version>Hoxton.SR9</spring-cloud.version>
</properties>
<dependencies>
<dependency>
<groupId>com.alibaba.cloud</groupId>
<artifactId>spring-cloud-starter-alibaba-nacos-discovery</artifactId>
</dependency>
<dependency>
<groupId>org.springframework.cloud</groupId>
<artifactId>spring-cloud-starter-gateway</artifactId>
</dependency>
<dependency>
<groupId>org.springframework.boot</groupId>
<artifactId>spring-boot-starter-test</artifactId>
<scope>test</scope>
<exclusions>
<exclusion>
<groupId>org.junit.vintage</groupId>
<artifactId>junit-vintage-engine</artifactId>
</exclusion>
</exclusions>
</dependency>
</dependencies>
<dependencyManagement>
<dependencies>
<dependency>
<groupId>org.springframework.cloud</groupId>
<artifactId>spring-cloud-dependencies</artifactId>
<version>${spring-cloud.version}</version>
<type>pom</type>
<scope>import</scope>
</dependency>
<dependency>
<groupId>com.alibaba.cloud</groupId>
<artifactId>spring-cloud-alibaba-dependencies</artifactId>
<version>${spring-cloud-alibaba.version}</version>
<type>pom</type>
<scope>import</scope>
</dependency>
</dependencies>
</dependencyManagement>
<build>
<plugins>
<plugin>
<groupId>org.springframework.boot</groupId>
<artifactId>spring-boot-maven-plugin</artifactId>
</plugin>
</plugins>
</build>
</project>
|
Gateway:网关,本文章中用到的重要依赖
Nacos:注册中心,Gateway结合Nacos实现请求转发
二、Application.yml配置文件
项目创建完毕后就要进行项目的配置了,否则只添加依赖没有任何用
1
2
3
4
5
6
7
8
9
10
11
12
13
14
15
| server:
port: 5000
spring:
application:
name: GATEWAY-1
cloud:
nacos:
discovery:
server-addr: 127.0.0.1:8848,127.0.0.1:8849,127.0.0.1:8850
gateway:
routes:
- id: nacos-demo
uri: lb://NACOS-DEMO
predicates:
- Path=/**
|
三、负载均衡
因为是Gateway结合Nacos使用的,而Nacos自带Ribbon负载均衡依赖,所以Gateway默认就开启了负载均衡,默认负载均衡策略就是轮询,如果要修改策略只需要配置一下即可
1
2
3
4
5
6
7
|
NACOS-DEMO:
ribbon:
NFLoadBalancerRuleClassName: com.netflix.loadbalancer.RandomRule
|
listOfServers可以去掉,会从注册中心获取服务地址
这样负载均衡就配置好了
FAQ
1)、服务熔断
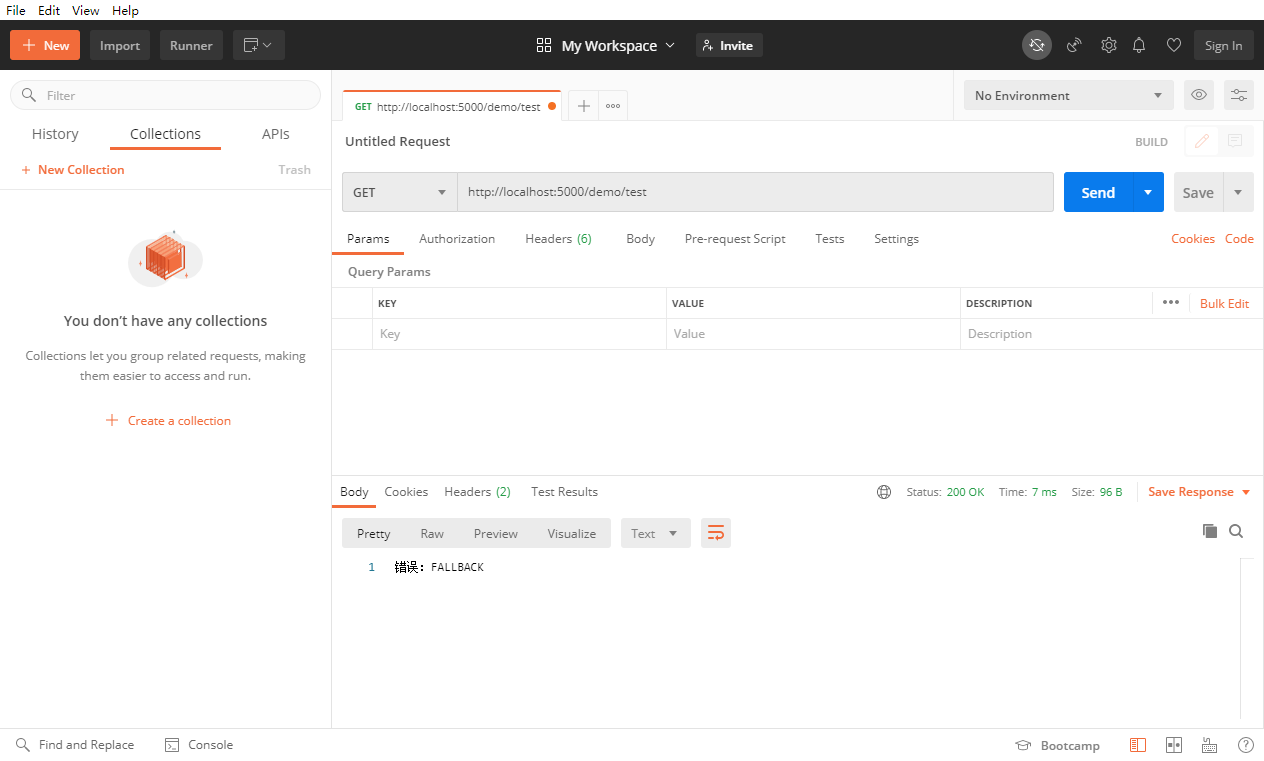
如果服务停止运行了,在通过Gateway请求转发时,就会报错,这时我们就要进行服务熔断,从而保证请求不会报错
1、添加依赖
需要结合Hystrix进行服务熔断,所以需要添加Hystrix的依赖
1
2
3
4
5
|
<dependency>
<groupId>org.springframework.cloud</groupId>
<artifactId>spring-cloud-starter-netflix-hystrix</artifactId>
</dependency>
|
2、创建服务熔断的请求接口
当服务熔断时Gateway会把请求转发到这个请求接口上
1
2
3
4
5
6
7
8
9
10
11
12
13
14
15
16
17
18
| package cn.yanghuisen.gateway1.controller;
import org.springframework.web.bind.annotation.RequestMapping;
import org.springframework.web.bind.annotation.RestController;
@RestController
public class FallBackController {
@RequestMapping("/fallback")
public String fallback(){
return "错误:FALLBACK";
}
}
|
3、修改转发配置
1
2
3
4
5
6
7
8
9
10
11
| gateway:
routes:
- id: nacos-demo
uri: lb://NACOS-DEMO
predicates:
- Path=/**
filters:
- name: Hystrix
args:
name: fallback
fallbackUri: forward:/fallback
|
fallbackUri:会把请求转发到/fallback上
4、服务熔断测试
首先停止后端服务,然后访问URLhttp://localhost:5000/demo/test

Gateway-集群搭建
Gateway自己是不能搭建集群的,所以需要配合Nginx实现集群的搭建及负载均衡。集群搭建很简单, Gateway项目自己不用做改动。
准备:
- Nginx:1.19.4
- 多个Gateway项目(身边没有多余的电脑,我这里是通过修改端口的方法,同时跑两个Gateway)
Nginx下载地址:http://nginx.org/en/download.html
一、Nginx的负载均衡配置
上面说了,因为Gateway自身不能进行集群的搭建及负载均衡,所以需要在Nginx上进行负载均衡,转发到多个不同的Gateway上
修改Nginx下的conf下的nginx.conf文件,配置Nginx的反向代理,通过Nginx的反向代理实现负载均衡的配置
1
2
3
4
5
6
7
8
9
10
11
12
13
14
15
|
upstream backserver {
server localhost:5000;
server localhost:5001;
}
server {
listen 80;
server_name localhost;
location / {
proxy_pass http://backserver;
}
}
|
二、启动Nginx
启动:Nginx的启动很简单,只要双击Nginx下的nginx.exe启动即可,或者在Nginx下通过命令行start nginx启动
停止:Nginx下命令行nginx -s stop停止nginx
到此集群搭建完毕


